@RestController

public class QuoteApi {

    private static final GrantedAuthority GOLD_CUSTOMER = new SimpleGrantedAuthority("gold");


    @GetMapping("/quotes/{symbol}")

    public Mono<Quote> getQuote(@PathVariable("symbol") String symbol,

      BearerTokenAuthentication auth ) {


        Quote q = new Quote();

        q.setSymbol(symbol);

        if ( auth.getAuthorities().contains(GOLD_CUSTOMER)) {

            q.setPrice(10.0);

        }

        else {

            q.setPrice(12.0);

        }

        return Mono.just(q);

    }

}
现在,Spring 如何获取用户角色的呢?毕竟,这不是像 scopes 或 email 那样的标准 Claim。实际上,这里没有什么魔法:我们必须提供一个自定义的 ReactiveOpaqueTokenIntrospection,从 Keycloak 返回的自定义字段中提取这些角色。这个可在线获取的 Bean 基本上与 Spring 关于 这个主题的文档 中所示的相同,只是针对我们的自定义字段进行了一些细微的更改。
Java(编程语言)
还必须提供访问 Identity Provider 所需的配置属性:
spring.security.oauth2.resourceserver.opaquetoken.introspection-uri=http://localhost:8083/auth/realms/baeldung/protocol/openid-connect/token/introspect

spring.security.oauth2.resourceserver.opaquetoken.client-id=quotes-client

spring.security.oauth2.resourceserver.opaquetoken.client-secret=<CLIENT SECRET>
最后,可以将其导入 IDE 或从 Maven 中运行。为此,项目的 POM 中包含一个 Profile:
$ mvn spring-boot:run -Pquotes-application现在,应用在 http://localhost:8085/quotes 上为请求提供服务。可以使用 curl 检查它是否正常响应:
$ curl -v http://localhost:8085/quotes/BAEL不出所料,收到了 “401 Unauthorized” 响应,因为没有发送 Authorization Header。
6、Spring Cloud Gateway 作为 OAuth 2.0 资源服务器
作为资源服务器的 Spring Cloud Gateway 应用的安全配置与普通资源服务并无不同。
开发工具
因此,添加与后端服务相同的 Starter 依赖关系:
<dependency>

    <groupId>org.springframework.cloud</groupId>

    <artifactId>spring-cloud-starter-gateway</artifactId>

    <version>3.1.0</version>

</dependency>

<dependency>

    <groupId>org.springframework.boot</groupId>

    <artifactId>spring-boot-starter-oauth2-resource-server</artifactId>

    <version>2.6.2</version>

</dependency>
在启动类中添加 @EnableWebFluxSecurity:
@SpringBootApplication

@EnableWebFluxSecurity

public class ResourceServerGatewayApplication {

    public static void main(String[] args) {

        SpringApplication.run(ResourceServerGatewayApplication.class,args);

    }

}
与安全相关的配置属性与后台使用的相同:
软件
spring:

  security:

    oauth2:

      resourceserver:

        opaquetoken:

          introspection-uri: http://localhost:8083/auth/realms/baeldung/protocol/openid-connect/token/introspect

          client-id: quotes-client

          client-secret: <code class="language-css"><CLIENT SECRET>
接下来,只需添加路由声明即可:
  # ... 其他配置忽略

  cloud:

    gateway:

      routes:

      - id: quotes

        uri: http://localhost:8085

        predicates:

        - Path=/quotes/**
关于路由的详细用法,可以参阅 中文文档。
注意,除了 Security 依赖和 properties 外,我们没有更改网关本身的任何内容。
使用 spring-boot:run 运行网关程序,并指定带有所需设置的特定 Profile:
$ mvn spring-boot:run -Pgateway-as-resource-server6.1、测试资源服务器
首先,必须确保 Keycloak、后台服务和网关都在运行。
接下来,需要从 Keycloak 获取 Access Token。在这种情况下,最直接的方法就是使用 “密码授权模式”(又称 “资源所有者”)。这意味着向 Keycloak 发送 POST 请求,传递其中一个用户的用户名/密码,以及客户端 ID 和客户端应用的 Secret:
$ curl -L -X POST \

  'http://localhost:8083/auth/realms/baeldung/protocol/openid-connect/token' \

  -H 'Content-Type: application/x-www-form-urlencoded' \

  --data-urlencode 'client_id=quotes-client' \

  --data-urlencode 'client_secret=0e082231-a70d-48e8-b8a5-fbfb743041b6' \

  --data-urlencode 'grant_type=password' \

  --data-urlencode 'scope=email roles profile' \

  --data-urlencode 'username=john.snow' \

  --data-urlencode 'password=1234'
响应将是一个 JSON 对象,其中包含 Access Token 和其他值:
{

    "access_token": "...omitted",

    "expires_in": 300,

    "refresh_expires_in": 1800,

    "refresh_token": "...omitted",

    "token_type": "bearer",

    "not-before-policy": 0,

    "session_state": "7fd04839-fab1-46a7-a179-a2705dab8c6b",

    "scope": "profile email"

}
现在,可以使用返回的 Access Token 访问 /quotes API:
编程
$ curl --location --request GET 'http://localhost:8086/quotes/BAEL' \

--header 'Accept: application/json' \

--header 'Authorization: Bearer xxxx...'
会响应一个 JSON 格式的 Quote:
{

  "symbol":"BAEL",

  "price":12.0

}
重复这个过程,这次使用 Maxwell Smart 的 Access Token:
{

  "symbol":"BAEL",

  "price":10.0

}
如你所见,这次返回的 price 较低,这意味着后台能够正确识别相关用户。
还可以使用不带 Authorization Header 的 curl 请求,检查未经身份认证的请求是否会转发到后台:
$ curl http://localhost:8086/quotes/BAEL检查网关日志,可以发现没有与请求转发相关的信息。这表明响应是在网关生成的。
7. Spring Cloud Gateway 作为 OAuth 2.0 客户端
使用与资源服务器相同的启动类。
开发工具
事实上,比较这两个版本,唯一明显的不同之处在于配置属性。在这里,需要使用 issuer-uri 属性或各种端点(authorization、token 和 introspection)的单独设置来配置 Identity Provider 的详细信息。
还需要定义应用客户端 registration 的详细信息,其中包括请求的 scope。这些 scope 会告知 IdP 哪些信息项将通过 introspection 机制提供:
  # 其他属性省略

  security:

    oauth2:

      client:

        provider:

          keycloak:

            issuer-uri: http://localhost:8083/auth/realms/baeldung

        registration:

          quotes-client:

            provider: keycloak

            client-id: quotes-client

            client-secret: <CLIENT SECRET>

            scope:

            - email

            - profile

            - roles
最后,路由定义部分有一个重要变化。必须在任何需要传播 Access Token 的路由中添加 TokenRelay Filter:
软件
spring:

  cloud:

    gateway:

      routes:

      - id: quotes

        uri: http://localhost:8085

        predicates:

        - Path=/quotes/**

        filters:

- TokenRelay=或者,如果我们希望所有路由都启动授权模式,可以在默认过滤器(default-filters)部分添加 TokenRelay Filter:
spring:

  cloud:

    gateway:

      default-filters:

      - TokenRelay=

      routes:

  # 省略其他的路由定义
7.1、测试作为 OAuth 2.0 客户端的 Spring Cloud Gateway
在测试设置中,需要确保项目的三个部分都在运行。不过,这次使用不同的 Spring Profile 来运行网关,该 Profile 包含使网关成为 OAuth 2.0 客户端所需的属性。
示例项目的 POM 中包含一个 Profile,可以使用该 Profile 启动项目:
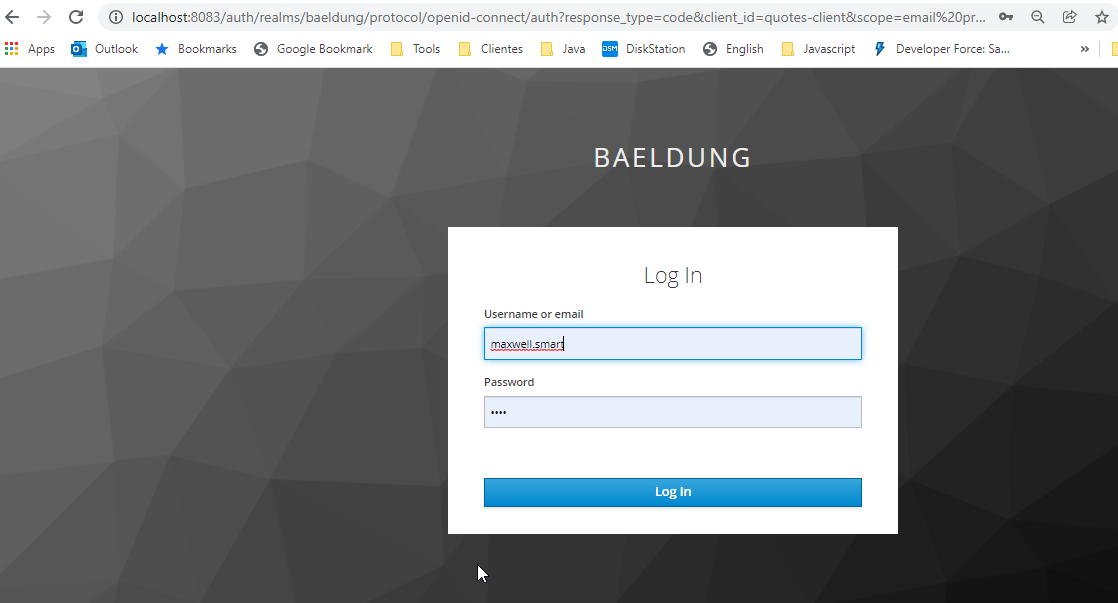
$ mvn spring-boot:run -Pgateway-as-oauth-client网关运行后,使用浏览器访问 http://localhost:8087/quotes/BAEL 进行测试。如果一切正常,你将被重定向到 IdP 的登录页面:
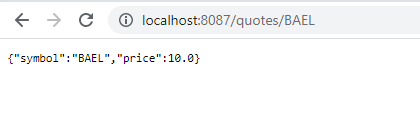
由于使用了 Maxwell Smart 的凭证,再次得到了一个更低的 price :
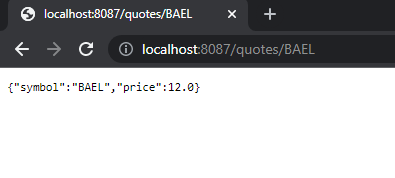
测试结束时,使用匿名/隐身浏览器窗口,并使用 John Snow 的凭证测试该端点。
这次得到的是正常的 price:
8、总结
本文介绍了 OAuth 2.0 的一些认证、授权模式以及如何使用 Spring Cloud Gateway 实现这些模式。
开发工具
参考:https://www.baeldung.com/spring-cloud-gateway-oauth2